
The cleaning and sterilization of laboratory glassware is a multi-step process designed to ensure that equipment is properly clean. Proper protocols prevent cross-contamination, protect personnel from hazardous residues, and ensure the accuracy of experimental results.
Materials & Equipments needed in Cleaning & Sterilization Process of glasswares
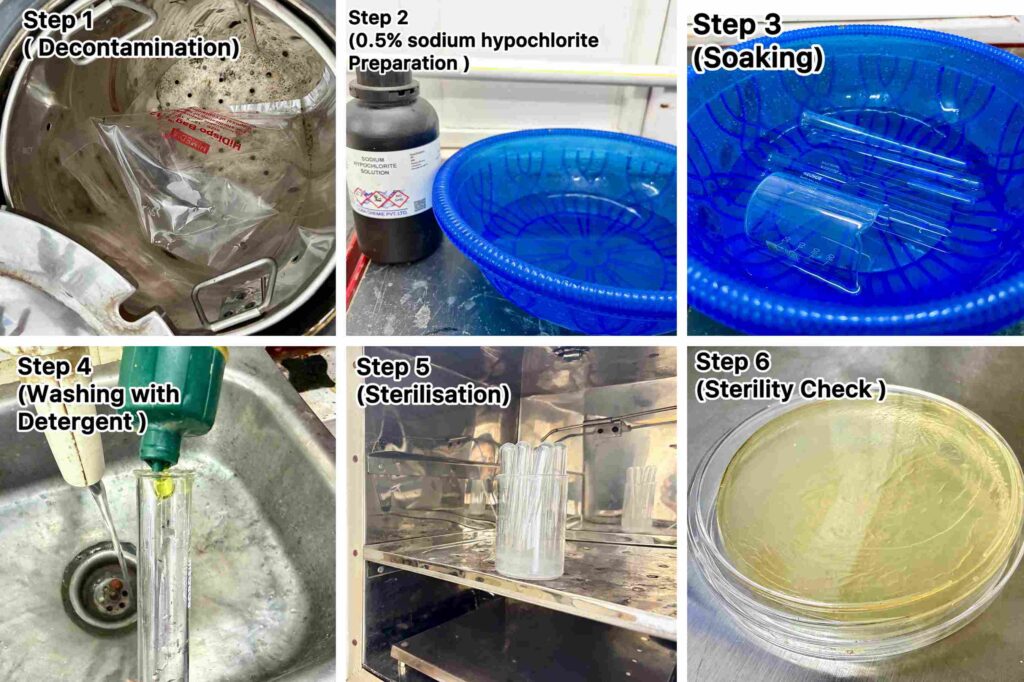
- 0.5% Sodium hypochlorite solution : It acts as a powerful disinfectant that kills microbes on contaminated glassware. It ensures items are safe for handling and reuse during sterilization.Add 0.5 ml sodium hypochlorite in 99.5 ml water to prepare 0.5% Sodium hypochlorite solution
- Detergent : Detergents effectively remove grease, oils, and residues that water alone cannot. They ensure surfaces are clean, preventing contamination and ensuring accurate results in future experiments.
- Tap water & Distilled Water : To rinse glasswares.
- Sterile peptone water : To prepare media.
- Plate Count Agar (PCA) :It is used to validate cleaning by detecting any surviving bacteria on cleaned glassware. It confirms the effectiveness of sterilization and ensures items are truly microbial-free for use.
- Sterile Petri plates : Used for microbial monitoring.
- Incubator 30°C±1 : It provides the temperature needed for any remaining microbes to grow, proving if sterilization worked.
- Hot air oven(160°C) : Provide dry heat sterilization, killing resistant microbes and spores.
- Autoclave : Used to decontamination.
Washing method of glasswares after work(Microbiological Testing)
Cleaning Procedure
Empty all media from glasswares after autoclaving/decontamination.
│
▼
Soak the glassware in 0.5% sodium hypochlorite solution for 30 minutes.
│
▼
Wash thoroughly using detergent.
│
▼
Rinse thoroughly with tap water after then distilled Water to remove detergent residues.
Sterilization Process of glasswares after Microbiological Testing
Dry Heat Sterilization
Allow glasswares to drain and dry completely.
│
▼
Wrap glasswares in clean brown paper or suitable sterilization wrapping material.
│
▼
Place in hot air oven.Sterilize at 160°C for 2 hours.
│
▼
Allow to cool inside the oven before removal.Store in a dust-free environment until use.
Sterility Check after cleaning of glasswares used in Microbiological Testing
Sterility Verification (Quality Check)
Aseptically pour 10 mL of sterile peptone water into the sterilized glassware.
│
▼
Incubate at 30°C±1 for 18–24 hours.
│
▼
After incubation, perform the pour plate technique using this peptone water as a 10⁻¹ dilution.
│
▼
Add appropriate volume of Plate Count Agar and allow solidifying.Incubate plates at 30°C±1 for 72 hours.(Whole process described previously)
│
▼
Observe for microbial growth.No Growth indicates the satisfactory sterilization.
FAQ: Cleaning & Sterilization of Glasswares After Microbiological Testing
1. Why is cleaning and sterilization important?
To prevent cross-contamination, ensure accurate test results, and maintain laboratory safety standards.
2. What should be done immediately after use?
Soak glassware in 0.5% disinfectant solution (sodium hypochlorite) for 30 minutes before washing.
3. How should glassware be cleaned?
- Wash with detergent and water
- Rinse thoroughly with tap water followed by distilled water
4. How is glassware sterilized?
- Autoclave: 121°C at 15 psi for 15–20 minutes
- Dry heat oven: 160°C for 2 hours (for dry glassware)
5. How should sterilized glassware be stored?
Store in clean, dry cabinets. Wrap if necessary and label with sterilization date.